Why give devices names
By default ETS names a device after its model. The site in this example has 67 Ekinex push buttons, and all 67 would be called “Pushbutton FF Serie” in the project.
The only way to find the right one is by its individual address, and the address says nothing about where the switch is mounted. That gets in the way in the topology, in the group monitor and during diagnostics: a telegram came from 1.1.33 — but what is it, and where?
A proper name fixes this for a couple of seconds of work per device. The example is a country house: two floors, the outdoor area and a summer kitchen, 142 devices and 2 002 group addresses.
| Individual address | Default name | Own name |
|---|---|---|
| 1.1.33 | Pushbutton FF Serie | SW 1.22.2 |
| 1.1.34 | Pushbutton FF Serie | SW 1.22.3 |
| 1.1.64 | Intra-Sewi KNX TH-L-Pr | PIR 1.14.1 |
| 1.1.121 | RM 16 T | SH-1.1 |
| 1.1.131 | HM 12 T | VA-1 |
The right-hand column tells you at once what the device is and where to look for it. The left one tells you only the model.
The name formula
The name of a device in a room is built from four parts: type, floor, room and the number of the device in that room. SW 1.22.3 is the third switch in room 22 on floor 1.
Devices in the distribution board belong to a line, not to a room: type, line number and a sequence number. SA-1.1 is the first switching actuator on the floor 1 line, SH-2.1 the first blind actuator on the floor 2 line.
| Prefix | Device | Example |
|---|---|---|
| SW | Switch, push-button panel | SW 1.22.3 |
| TP | Touch panel | TP 1.06.1 |
| PIR | Motion or presence detector | PIR 1.14.1 |
| SA | Switching actuator | SA-1.1 |
| SH | Shutter and blind actuator | SH-1.1 |
| VA | Heating valve actuator | VA-1 |
| DALI | DALI gateway | DALI-1 |
| BIN | Binary input | BIN-1 |
| AC | Air-conditioning gateway | AC-4.1 |
| LC | Line coupler | LC-4 |
| IP | IP interface | IP |
| Meteo | Weather station | Meteo-1 |
Prefixes are Latin letters and English abbreviations. That way a name reads the same in any ETS language and does not break on export.
Where the room number comes from
The room number and the switch number in the name should match the ones on the interior design drawings. Then the electrician, the designer and the programmer all talk about the same SW 1.22.3, not about “the second switch to the left of the door”.
How to get there depends on who draws the switch layout:
- We draw it ourselves — we number by the scheme right away: type, floor, room, number.
- The lead contractor draws it — we ask them in advance to number the switches the same way. It helps everyone who works with the project later.
- The contractor refuses — we fit their numbering into ours, but still put the floor and the room in front, separated by dots. For example, if the contractor numbers switches consecutively across the floor, their twelfth switch in room 22 becomes SW 1.22.12.
Write the room number with two digits: 1.06, not 1.6. When sorting by name — in ETS, in a CSV export, in Excel — SW 1.10 can end up above SW 1.2 without the zero. With the zero the list runs in order: 1.01, 1.02 … 1.10.
Floors follow the drawings: here floor 1 is the ground floor, so the level below it is 0: SW 0.01.1.
The Description field
The name answers “what and where”. Anything else you need to see at a glance that does not fit into the name goes into the Description field.
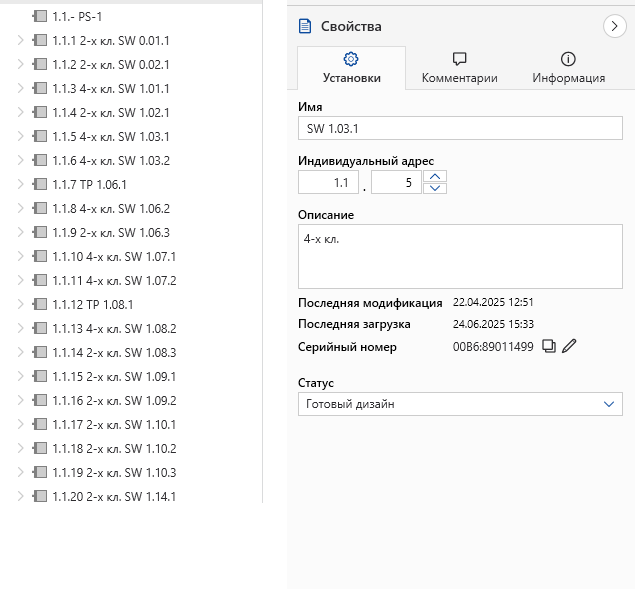
On the example site all 67 switches are the same Ekinex model, but with a different number of buttons: 39 two-button and 28 four-button ones. In ETS they share the same product name, so it cannot tell them apart. That is why each one has “2-х кл.” or “4-х кл.” in its description — Russian shorthand for two-button and four-button.
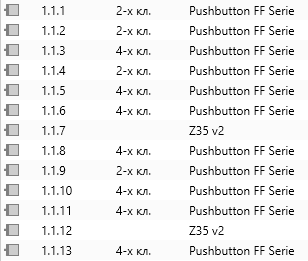
The description also shows in the topology tree, on the same line as the address and the name. While configuring you see at once how many buttons a switch has, without opening its parameters.
An individual address plan
Names help inside the project. But the group monitor and error messages often show only the individual address. So addresses are handed out by a system too.
A line is a zone of the house:
| Line | Zone | Devices |
|---|---|---|
| 1.1 | Floor 1 (ground floor) | 79 |
| 1.2 | Floor 2 | 56 |
| 1.3 | Outdoor area | 2 |
| 1.4 | Summer kitchen (BBQ) | 5 |
Within a line, each device type has its own range, reserved in advance:
| Range starts at | Devices | On line 1.1 |
|---|---|---|
| .0 | Line coupler | — (on 1.2–1.4: 1.2.0, 1.3.0, 1.4.0) |
| .1 | Switches and touch panels (SW, TP) | 1.1.1–1.1.40 |
| .51 | Motion detectors (PIR) | 1.1.51–1.1.65 |
| .101 | Switching actuators (SA) | 1.1.101–1.1.106 |
| .111 | DALI | 1.1.111 |
| .121 | Blind actuators (SH) | 1.1.121–1.1.123 |
| .131 | Valve actuators (VA) | 1.1.131–1.1.134 |
| .151 | Binary inputs (BIN) | 1.1.151–1.1.154 |
| .160 | Air-conditioning gateway | 1.1.160 |
| .200 | Sensors | 1.1.200–1.1.202 |
| .240 | IP interface | 1.1.240 |
| .250 | DALI gateway | 1.1.250 |
Now an address reads without opening the project: 1.2.53 is a motion detector on floor 2, 1.1.122 a blind actuator on floor 1.
There is spare room between the ranges. On floor 1 the switches and panels take .1–.40, and .41–.50 are free. A switch added later gets an address in its own range, and the order stays intact.
The ranges were set before the first device got its address. More than 50 switches on one line is rare in a private house or an apartment. On a larger site you can recalculate the proportions of the ranges or give the switches a line of their own.
The same codes in group addresses
Floor and room numbers work in group address names too. Then the group monitor shows not only what switched, but also where.
| Address | Name | What it is |
|---|---|---|
| 2/0/3 | L 1.2.1a On/Off | One light channel in room 1.2 |
| 2/5/0 | GroupL 1.2.1(a-c) On/Off | Channels a, b and c in one command |
| 2/6/1 | Light On/Off 1.2 Гардеробная при входе | All lights in the room (entrance dressing room) |
| 4/0/1 | BL 1.7.1 Move | Blind in room 1.7 |
| 5/2/3 | CZ_106 SetPoint | Climate setpoint: floor 1, room 06 |
| 10/0/1 | HF_101 Active | Underfloor heating: floor 1, room 01 |
| 15/0/3 | Temp SW 1.02.1 | Temperature from the sensor in switch SW 1.02.1 |
The last row is a separate trick: the name of an address carrying sensor data includes the name of the device that sends it. If a room temperature looks odd, you know right away which switch to check.
How to lay out the group address ranges themselves is covered in the article on group address structure.
How to structure 2 000 KNX group addressesWhere the system breaks
The scheme works as long as it is followed everywhere. One name that breaks the rules — and a filter or a sort misses it. Most often it happens like this:
- Different room number formats — 1.06, 1.6 and 106 are the same room, but a search for “1.06” finds only the first. Pick one format and keep it in devices and group addresses alike.
- A device number that is sometimes there and sometimes not — decide in advance whether you add “.1” when a room has only one switch. Otherwise the same project ends up with both SW 1.24 and SW 1.21.1.
- Letters from another alphabet — a Cyrillic “с” and a Latin “c” look identical, but to a search they are different letters. And after a CSV import or export in another encoding, non-Latin letters turn into something like “СЃ”.
- Two prefixes for one type — if some couplers are called LC and others LS, a filter for “LC” will not show them all. One type, one prefix from the table.
- Case and stray characters — “Pir” instead of “PIR”, a double space, a random character at the end of a name. In ETS it is barely visible, but in an export, a script or a visualisation such a name no longer matches the rest.
Checklist
Before the project starts
- The name scheme is agreed: type, floor, room, number in the room.
- The prefix table is ready: Latin letters, one prefix per type.
- The contractor who draws the switch layout numbers by this scheme — or it is clear how to fit their numbers in.
- One room number format is chosen — for devices and for group addresses.
- Lines are split by zones, and within a line each type has its own individual address range with spare room.
During the work
- Every device gets its name as soon as it is added to the project.
- The Description holds what is not in the name but is needed often (number of buttons).
- Group address names use the same floor and room codes; sensor data carries the name of the sending device.
Before handover
- No devices with factory names left.
- No non-Latin letters in prefixes and codes.
- No mixed case, double spaces or stray characters.
- The device list sorted by name runs by floors and rooms with nothing out of place.