A humidifier needs a humidistat: something that switches it on when the air is dry and off once the humidity is back. A dedicated KNX humidistat is one more device on the wall or in the cabinet, and one more line on the quote.
Often you can do without it. KNX panels and sensors usually have built-in thermostats, and not all of them are in use. A thermostat does not care what it controls: it compares a number with a setpoint and switches an output on or off. Feed it humidity instead of temperature and you have a humidistat.
Below is how this was done in a 72 m² apartment with five climate zones. Each zone has a Zennio Z35 v2 panel with a built-in humidity sensor and a humidifier switched through a relay on a Zennio MAXinBOX 24 v2 actuator. We show one zone; the other four are set up the same way.
What it has to do
- Humidity below the setpoint — the humidifier runs. Setpoint reached — it stops.
- The panel shows the current humidity. The setpoint can be changed, and humidification can be switched off altogether.
- The panel shows whether the humidifier is running right now.
- The relay does not click every couple of minutes.
Why a thermostat can do the job
A thermostat in “Heating” mode is simple: value below the setpoint — output on; above — output off. A humidifier is to humidity what heating is to temperature: switch it on and the value goes up. So “Heating” mode is exactly the humidistat mode.
KNX sends temperature and humidity in the same format, a two-byte floating-point number (DPT 9). To the thermostat, 40 % humidity and 40 °C are the same number, 40. It does not need to know that it is a percentage.
Seven group addresses
The humidistat needs seven addresses: command and status for on/off, command and status for the setpoint, the humidity, the actuator channel command and its status.
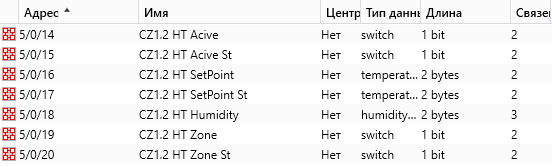
| Address | Carries | Sent by | Listened to by |
|---|---|---|---|
| 5/0/14 HT Acive | Humidification on/off | Cell K5 on the screen | Thermostat 2: On/Off |
| 5/0/15 HT Acive St | On/off status | Thermostat 2 | Cell K5 |
| 5/0/16 HT SetPoint | Setpoint, % | Cell K7 | Thermostat 2: Setpoint |
| 5/0/17 HT SetPoint St | Setpoint status | Thermostat 2 | Cell K7 |
| 5/0/18 HT Humidity | Humidity, % | Panel humidity sensor | Thermostat 2 and cell K6 |
| 5/0/19 HT Zone | Humidifier command | Thermostat 2 | Actuator channel |
| 5/0/20 HT Zone St | Humidifier running | Actuator channel | Cell K8 |
Step 1. The humidity sensor
The Z35 v2 has the humidity sensor built in. Its parameters are on the “Humidity → Configuration” page. The screenshots come from a Russian-language ETS, so the tables give the parameter names in English.
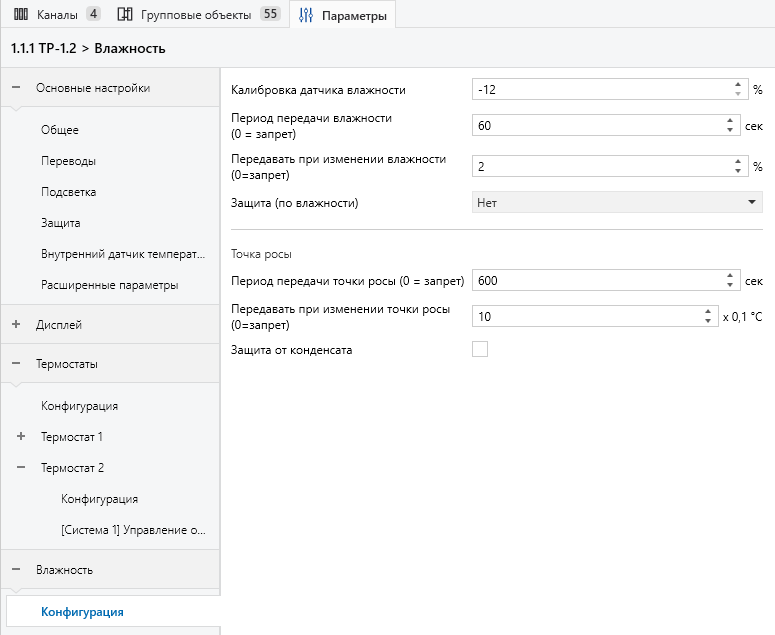
| Parameter | Value | Why |
|---|---|---|
| Humidity sensor calibration | −12 % | Checked against a hygrometer: the panel read 12 % high. Without the correction the humidifier would stop short |
| Humidity sending period | 60 s | The thermostat gets a fresh value every minute even when humidity does not change — after a restart, for example |
| Send on humidity change | 2 % | A noticeable change goes out at once instead of waiting for the period |
| Protection (humidity) | No | No threshold alarms needed: the thermostat does the control |
| Dew point | 600 s, on a 1 °C change | Not needed for the humidistat |
Step 2. A thermostat as the humidistat
The Z35 v2 has two thermostats. The first one runs the room temperature, the second is free, so that is the one we turn into a humidistat. ETS labels the setpoint in °C, but that is only a label: the thermostat works with a number.
Thermostat 2 → Configuration
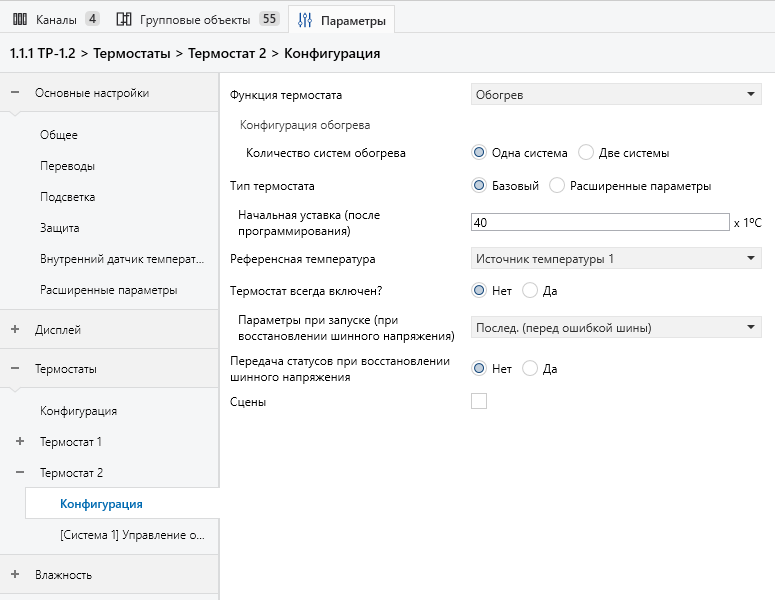
| Parameter | Value | Why |
|---|---|---|
| Thermostat function | Heating | The output switches on when the value is below the setpoint, which is what a humidifier needs |
| Number of heating systems | One system | One humidifier, one output |
| Thermostat type | Basic | A single setpoint, without comfort, economy and protection modes |
| Initial setpoint | 40 | After a download the thermostat starts at 40 % |
| Reference temperature | Temperature source 1 | The thermostat takes its value from an external object rather than from its own temperature sensor. The humidity arrives here |
| Thermostat always on? | No | Adds an On/Off object, so humidification can be switched off from the panel |
| Startup settings | Last (before bus failure) | After a bus power loss the thermostat restores its setpoint and on/off state |
[System 1] Heating control
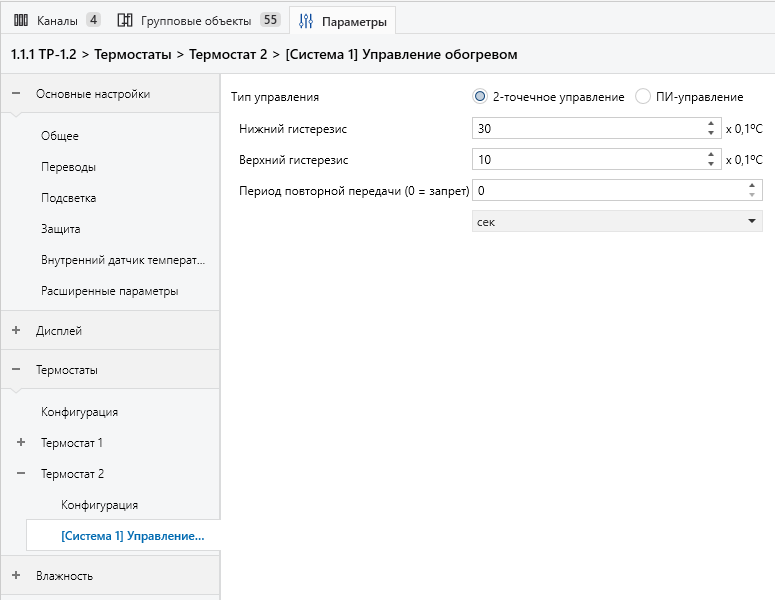
| Parameter | Value | Why |
|---|---|---|
| Control type | 2-point control | A humidifier can only switch on and off; it has no use for smooth PI control |
| Lower hysteresis | 30 × 0.1 = 3 % | Switches on when humidity drops below 40 − 3 = 37 % |
| Upper hysteresis | 10 × 0.1 = 1 % | Switches off at 40 + 1 = 41 % |
| Cyclic sending period | 0 | The command goes out only when the output switches |
The result is a 37–41 % band. The lower hysteresis is wider than the upper one, so the humidifier starts less often and runs longer each time, and the relay does not click on every small swing in humidity.
Thermostat and sensor objects
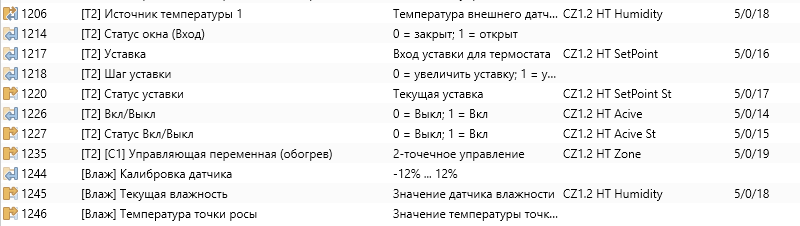
| Object | Address |
|---|---|
| 1206 [T2] Temperature source 1 | 5/0/18 HT Humidity — the humidity arrives here |
| 1217 [T2] Setpoint | 5/0/16 HT SetPoint |
| 1220 [T2] Setpoint status | 5/0/17 HT SetPoint St |
| 1226 [T2] On/Off | 5/0/14 HT Acive |
| 1227 [T2] On/Off status | 5/0/15 HT Acive St |
| 1235 [T2] [C1] Control variable (heating) | 5/0/19 HT Zone — the actuator channel command |
| 1245 [Hum] Current humidity | 5/0/18 HT Humidity — the humidity goes onto the bus from here |
Address 5/0/18 has type DPT 9.007 (humidity), while the “Temperature source 1” object is DPT 9.001 (temperature). ETS lets you link them because both objects are two bytes in the same format. Two objects listen to this address, the thermostat and cell K6 on the screen, which is why it shows three links.
Step 3. The relay and the humidifier
The humidifier is wired to the relay through its ON/OFF control input, a dry contact. Its power supply stays on; the relay only enables or disables it. That way the relay never switches a power load, and the humidifier starts and stops itself the way it is meant to.
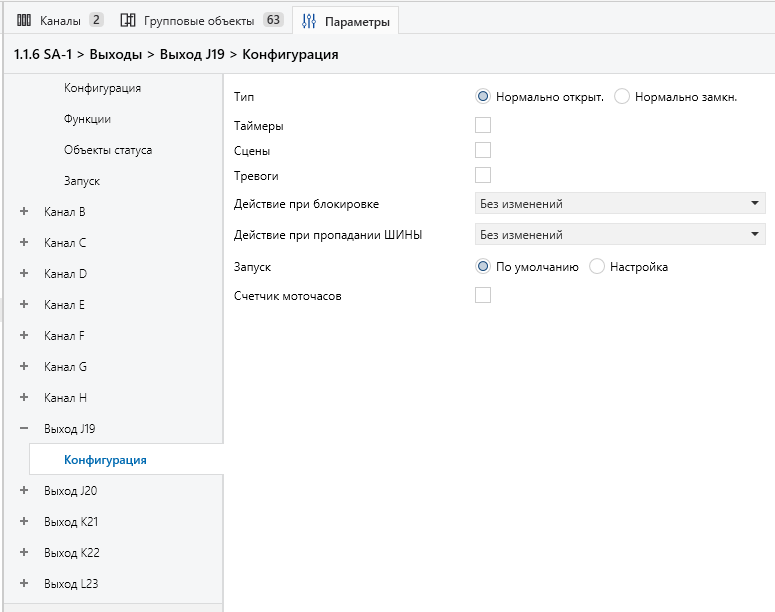
| Parameter | Value | Why |
|---|---|---|
| Type | Normally open | The contact closes when a 1 arrives, and the humidifier runs |
| Timers, scenes, alarms | off | Not needed: the thermostat drives the output |
| Action on lock and on bus failure | No change | The output stays in whatever state it was in |
Relay objects
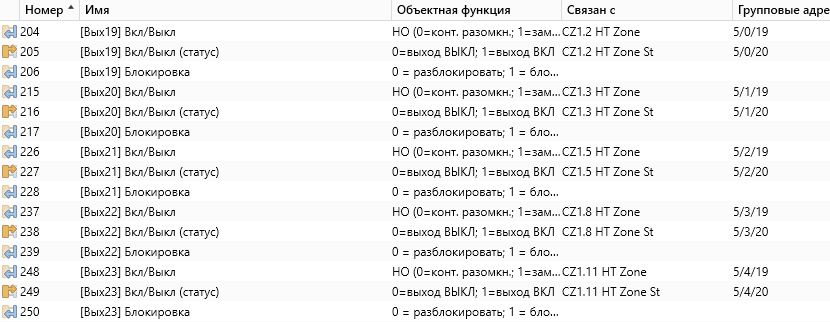
Output J19 takes its command from 5/0/19 and sends its status to 5/0/20. The other four zones work the same way on outputs J20, K21, K22 and L23, each zone with its own address group.
Step 4. The panel interface
The Z35 v2 itself deserves a word here. Its pages are built from cells, and each cell can be given its own function — a button, an indicator, a number field, an enumeration — and its own label. That lets you build an interface on the panel for almost anything, not just lighting and climate.
Four cells were enough for the humidifier.

| Cell | Function | Addresses |
|---|---|---|
| K5 | “0/1” switching plus indicator: humidification on and off | → 5/0/14, ← 5/0/15 |
| K6 | 2-byte indicator: current humidity | ← 5/0/18 |
| K7 | 2-byte control plus indicator: setpoint | → 5/0/16, ← 5/0/17 |
| K8 | Binary indicator: humidifier running | ← 5/0/20 |
What happens in operation
The table doubles as a test plan with the ETS group monitor.
| Situation | What goes onto the bus | Result |
|---|---|---|
| Humidity drops below 37 % | Sensor: 36.5 on 5/0/18. Thermostat: 1 on 5/0/19 | The relay closes the contact and the humidifier runs. The relay sends 1 to 5/0/20 and the indicator on the panel lights up |
| Humidity reaches 41 % | Thermostat: 0 on 5/0/19 | The humidifier stops and the indicator goes out |
| Humidity between 37 and 41 % | Humidity values only | Nothing switches |
| The resident raises the setpoint to 45 % | Panel: 45 on 5/0/16. Thermostat: 45 on 5/0/17 | The switch-on threshold is now 42 %. If humidity is below it, the humidifier starts |
| The resident switches humidification off | Panel: 0 on 5/0/14. Thermostat: 0 on 5/0/15 | The thermostat is off and does not start the humidifier |
| Bus power lost and restored | The sensor sends humidity within a minute | The thermostat restores its setpoint and on/off state |
Things to keep in mind
- Calibration. Check the panel sensor against a hygrometer before you pick a setpoint. The sensor measures the air at the wall where the panel hangs and can be noticeably off from the real humidity.
- The humidifier’s own humidistat. If it has one, set it higher than the KNX setpoint. Otherwise the humidifier stops before the thermostat decides it should.
- Where the humidifier stands. Keep it away from the panel: a stream of moist air on the sensor switches the humidifier off before the whole room has reached the setpoint.
- Bus failure. With “No change” the relay output stays as it was: if the humidifier was running, it keeps running. If that is not acceptable, set the output to switch off.
- Labels in ETS. The setpoint and hysteresis are labelled in °C. That is not a mistake; the thermostat simply works with a number.
Commissioning checklist
- Humidity sensor checked against a hygrometer and the calibration entered
- Humidity sending period set (60 s here)
- Thermostat 2: Heating, Basic, Temperature source 1, “Thermostat always on?” — No
- 2-point control: 3 % below, 1 % above
- Humidity linked to the thermostat’s temperature source and to the indicator on the screen
- Control variable linked to the relay output, relay status linked to the indicator
- In the group monitor: the humidifier starts below 37 % and stops at 41 %
- Humidification switched off while the humidifier was running: 0 went out on 5/0/19 and the humidifier stopped
- Bus power switched off and on: setpoint and on/off state kept
When this is not enough
A spare thermostat makes a simple humidistat: on when it is dry, off when it is enough. If humidification has to take other things into account — airing, the air conditioner, a night mode — that logic is easier to keep in a controller. In this same apartment that is how the air conditioners work: a Wiren Board runs them, while humidification gets by without it.
The 72 m² case: five climate zones on Z35 panelsTwo-pipe air conditioning: keeping every modeKNX programming as a service